Quick Notes on Taking a Website Live
Contents
Update (2026-09-23): This site now runs on both Cloudflare Pages and EdgeOne for international and mainland China access. Both deploy from the same GitHub main branch with the same build command and output directory. The notes below preserve the original Cloudflare setup experience.
Sharing what I learned taking a website live, tracing the road I came down, in the hope it can help you out.
The main flow:
Build the site -> push to Github -> deploy on Cloudflare Pages -> register and switch to a custom domain -> submit to search engines
The whole process turned out easier than I expected.
1. Pushing to Github
For launch and long-term maintenance, Git integration is the most convenient path. Push the code to a GitHub or GitLab repository and Cloudflare pulls, builds, and deploys automatically.
Every git push triggers a build and a deploy on its own.
GitHub as the example:
- Create a new repository on Github — private or public both work
- Finish the initial commit from the terminal
git init                     # initialize
git add .                    # stage files
git commit -m "feat: init project"  # first commit
git remote add origin https://github.com/<user>/<repo>.git
git branch -M main           # make sure the branch is main
git push -u origin main
First time pushing to Github it will ask for your username and email.
git add .vsgit add -A: the former stages changes including deletions in “folder A” only and does not pick up new files in “folder B”; the latter stages every change across the whole repository (folder A deletions and folder B additions alike).
- Daily updates afterwards (assuming no new commits on the remote — otherwise
git pullorgit pull --rebasefirst))
git status          # (optional) see what changed
git add .           # stage all changes
git commit -m "feat: update content"  # commit
git push            # push to GitHub
2. Going live on CF
Like many sites, I chose Cloudflare to deploy — the deciding factor is its generous free tier for individual webmasters: acceleration, security, and easy management in one.
For a small personal project like mine, cf is plenty.
The Cloudflare free tier includes a CDN with unlimited bandwidth, unmetered DDoS protection, and free SSL certificates. Bought separately, these cost real money.
The drawback: for sites mainly serving users in mainland China, the free tier lacks local edge nodes, so access is slow.
For hosting in mainland China, the mainstream choice is a server from a domestic cloud (Alibaba/Tencent) — good speed and stability for Chinese visitors, but the site must be filed for ICP.
For purely static sites (blogs, docs), you can also pick a static hosting platform with China-friendly nodes, or self-host an origin behind a domestic CDN.
My example, on CF:
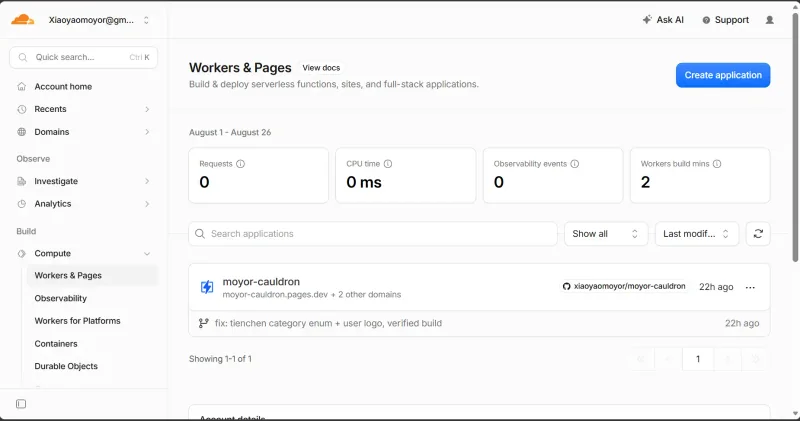
- On the Cloudflare dashboard, search Workers & Pages from the top-left, then click Create application. Note the default is Create Worker — click “Looking to deploy Pages? Get started” below it to reach Create Pages.
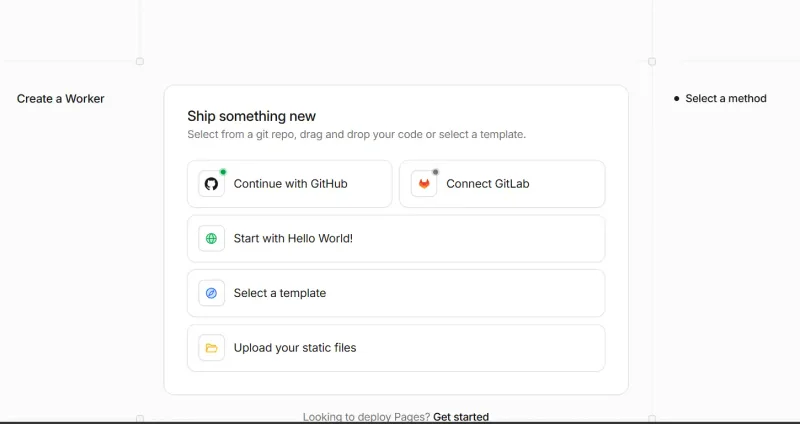
- Choose to continue with GitHub, authorize, pick the site repository and the main branch
-
Fill in the build settings.
- Framework preset:
Astro(match your framework) - Build command:
pnpm build - Build output directory:
dist
- Framework preset:
-
Finally Save and Deploy: after 2–3 minutes you get
project-name.pages.dev.
3. Using your own domain
At the end of the last step we got something like moyor-cauldron.pages.dev — free, and the site already opens through it.
But .pages.dev is a second-level domain: generic-looking, and so easy to obtain that such URLs are often flagged as risky (e.g. opened inside WeChat). So getting a more suitable domain is worthwhile.
For China, Alibaba Cloud or Tencent Cloud are friendly options with easy payment and clear identity verification. Alibaba Cloud as the example:
-
Sign in to Alibaba Cloud with an account that has passed real-name verification.
-
Open the Domain Registration product page, search for the prefix you want (e.g.
moyor) and pick a suffix (.com,.cn…). Popular suffixes cost more but often have first-year discounts. -
First-time buyers must create an “information template” to complete the domain’s identity verification (separate from the account verification). Review takes 1–3 business days.
Since I use servers outside mainland China, no ICP filing is needed.
-
In the Alibaba Cloud domain console, add a DNS record.
The free DNS tier is enough — it is only weaker in overseas performance, stability, query limits, and protection.
| Setting | Value | Notes |
|---|---|---|
| Type | CNAME | Points the domain to another domain (alias). |
| Host | @ or www | @ is the apex (e.g. moyor.com), www is the www.moyor.com subdomain. |
| Line | Default | Keep default. |
| Value | your-project.pages.dev | Your Cloudflare Pages address, e.g. moyor-cauldron.pages.dev. |
| TTL | 10 min or 600s | Cache duration; default is fine. |
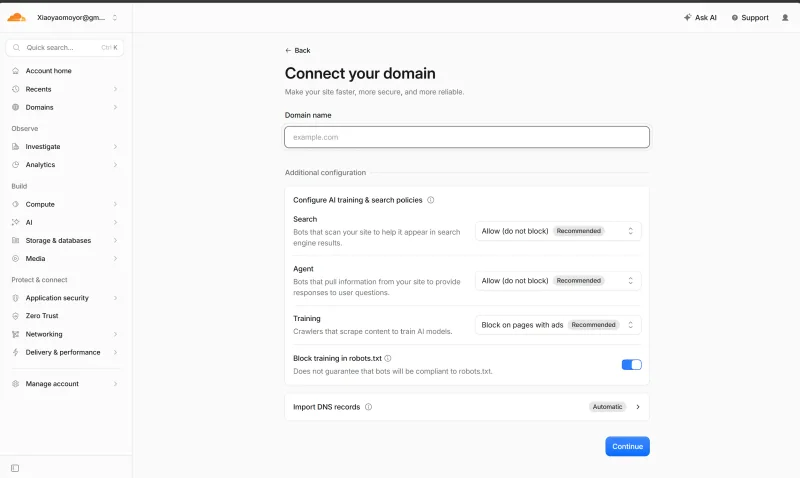
- Back in CF, add the new domain (steps as of 2026.8):
- Find your project, click add domain to reach Add a site.
- Choose Connect a domain.
- Enter the domain you bought.
- Review the imported records; add any extras here too (like a www domain).
- Pick the free plan.
- Click continue, copy the two nameservers CF provides, then in the Alibaba Cloud domain console replace the default NS records with them.
- Wait for DNS to propagate (minutes to hours), then the site opens on the new domain.
4. Adding the site to search engines (optional)
A site nobody can search for is a painful thing. Search engines do discover sites on their own, but that process is full of uncertainty.
Google finds new sites mainly through two paths — inbound links and data feeds — but for small, new sites both can take ages.
Rather than waiting passively, submit proactively: it shortens the wait from “a few random months” to “a predictable few days”.
Below, Google and Baidu as the examples.
1. Add and verify ownership
Prove to Google that you own the site.
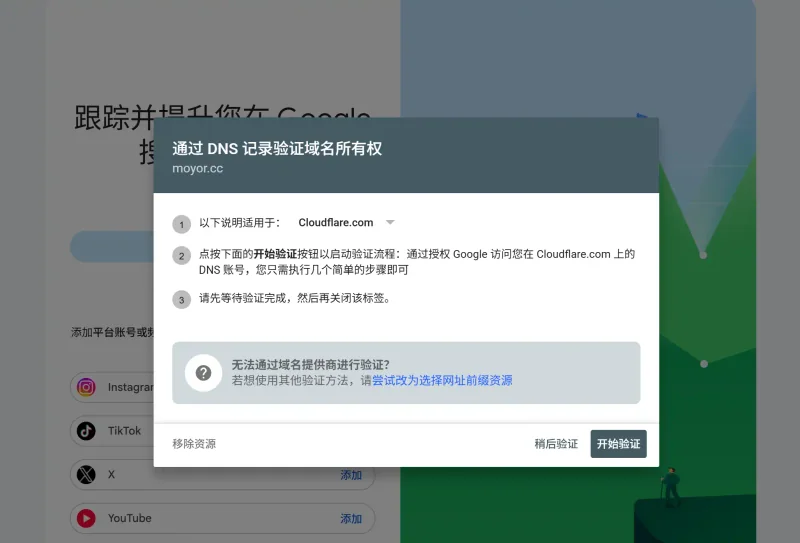
- Sign in to GSC, click Add property
- Choose the Domain resource type and enter your apex domain (e.g.
example.com)- This covers the widest ground, verifying every subdomain of that domain (like
www.example.comandshop.example.com). - URL prefix, by contrast, needs the full URL (e.g.
https://www.example.com). It only verifies that one exact URL.
- This covers the widest ground, verifying every subdomain of that domain (like
- Choose cf’s ownership verification provider, start verification, then authorize on the cf page (a DNS record is added to cf automatically).
2. Submit the sitemap
A sitemap lists all important page URLs; submitting it helps Google crawl your site more completely and efficiently.
-
Generate a sitemap — online tools like XML-Sitemaps.com work:
-
Enter your site in the box in the middle of the page.
-
Click “Start” and the tool crawls your site on its own.
-
Then download the generated
sitemap.xml.The free version caps at 500 pages — plenty for my site as it stands
But if your site generates its sitemap at build time (the
@astrojs/sitemapplugin) — everygit pushincludes the newest games, notes and albums automatically, zero manual maintenance, ever. -
-
Upload the sitemap
- Upload it to the root of your site. That directory is normally where your homepage file (like
index.html) lives. - As with any normal site update, drop the downloaded sitemap.xml next to index.html, push to the repo, and wait for cf to redeploy
- Submit in GSC
- Open Sitemaps in the left menu, enter the sitemap URL such as
https://moyor.cc/sitemap-index.xml, and submit -
A
Sitemap.xmlis a static file: as the site updates it never “breaks”, but it does go stale — after major updates regenerate thesitemap.xml, then update it in GSC or let Google refetch on schedule.
- Open Sitemaps in the left menu, enter the sitemap URL such as
3. Manually request indexing
- In the GSC top search box (URL Inspection), enter
https://moyor.cc/ - Click “Request Indexing” — actively ask Google to crawl the homepage
- Then wait: usually days to two weeks before Google crawls and indexes it. Verify by searching
site:your-apex-domainon Google, e.g.site:moyor.cc
4. Monitor and maintain
After submitting, Google needs time to crawl and index. GSC’s Performance report shows the site’s clicks, impressions, and keyword rankings.
Bing
Once Google is set up, open Bing Webmaster Tools and choose “Import from Google Search Console” — done.
Baidu
Same idea via the Baidu Search Resource Platform (formerly Baidu Webmaster). Its logic mirrors Google Search Console: verify ownership first, then submit data.
Chinese engines crawl foreign-hosted sites much more slowly:
- Baidu’s spiders live mainly in mainland China — crawling overseas servers means longer RTTs and unstable links;
- Per Chinese regulation, sites serving Chinese users require an ICP filing, and search engines may reduce crawl frequency and indexing priority for unfiled sites
1. Add and verify ownership
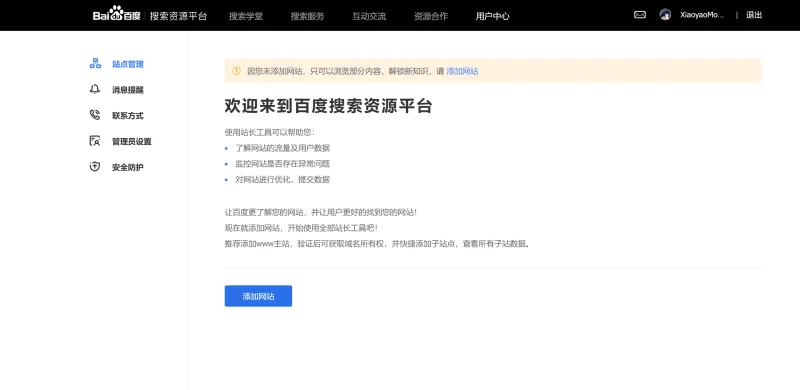
- Sign in to the Baidu Search Resource Platform, then in “User Center” -> “Site Management”, click “Add Website”.
-
After the identity steps, enter the full site address (e.g.
https://moyor.cc). Note: if the site is on HTTPS, be sure to choose thehttps://protocol, or verification may failGoogle honors the canonical tags on every page to identify the main site, but Baidu mostly ignores canonical and only respects 301 — so settle on one primary host (the www version or the apex).
Just create the right rule from CF’s Rules -> Overview templates. -
Fill in the site category, then choose an ownership verification method.
- Choose “file verification” and place the verification file in the root of your configured domain ([https://moyor.cc).
- Or choose “HTML tag verification”
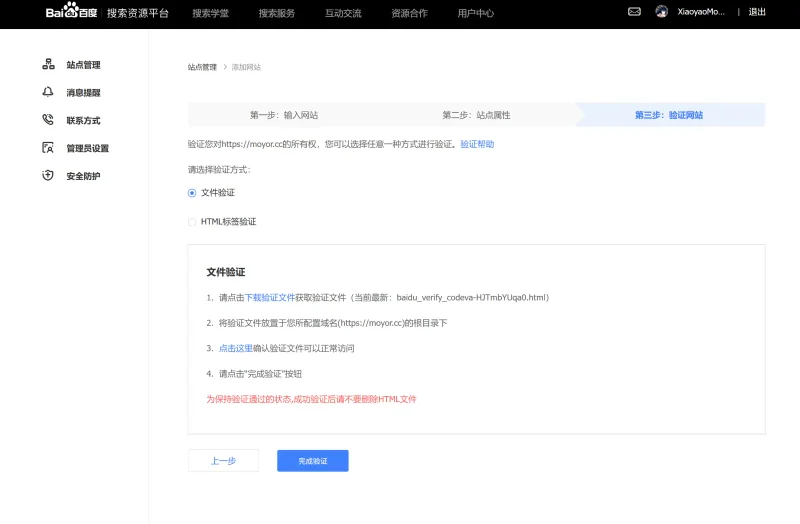
- In theory, once the site is verified you can submit the sitemap.
In practice, both methods kept erroring out wildly for me:
https://moyor.cc — file verification, moments ago
Reason: unable to connect to your website's server.
Problem analysis & solutions: check that the site opens normally. In some cases network or carrier issues (China Unicom/Telecom) prevent Baidu's servers from reaching your site — check your network or try again later.
None of the many fixes I tried worked, so I gave up on Baidu submission. Perhaps the dual-server + smart-DNS setup will make this much easier in the future.